Introduction
Welcome to Part 2 of ‘Hybrid orthodox+AI document automation with WordPress’. In Part 1, we talked about:
- how automating document creation by replacing ‘direct replacement’ and ‘conditional content’ merge tags in an underlying document template, based on a person’s form inputs, can significantly streamline workflows (we called this the Orthodox Approach); and
- how the use of natural language prompts to obtain an output with AI tools like ChatGPT can likewise significantly streamline workflows (we called that the AI Approach).
We said:
- the Orthodox Approach is excellent for consistent, structured, and dependable output; and
- the AI approach, when used well, can be excellent for the summarisation, correction, or other manipulation of a user’s input, which can be particularly useful where a form is collecting significant volumes of free-text user input and including it in the documentary output. We noted it can also be excellent for the generation of content based on sufficiently-precise prompts which, again, can be included in the documentary output.
“Wouldn’t it be awesome”, we pondered, “if we could implement, within WordPress, a hybrid approach to document automation that leverages the best of both approaches, producing docx output for review and, if required, further editing”. We were talking about a form containing fields that collect data for ‘direct replacement’ and ‘conditional content’ merge tags in an underlying document template, as well as fields in the same form that obtain AI-generated content on the fly that can be used in the documentary output.
In Part 1, we explained how this is, in fact, possible right now, using Gravity Forms + GravityWiz’s Gravity Forms OpenAI + GravityWiz’s Populate Anything + GravityMerge’s GM Templated DOCX. To understand how to create the hybrid approach with those plugins, take a look at Part 1.
In this Part 2, we’re going to look at how the hybrid approach can be achieved using Gravity Forms + GravityWiz’s Gravity Forms OpenAI + GravityWiz’s Populate Anything (optional) + GravityWiz’s Post Content Merge Tags + GravityMerge’s GM HTML to DOCX.
Main difference between Part 1 and Part 2 approaches = docx template vs html to docx conversion
The main difference between the approach in Part 1, and the approach in this Part 2, is that the Part 1 approach relies on the use of a pre-existing docx template with merge tags, created in Microsoft Word, that is uploaded to GravityMerge’s GM Templated DOCX, whereas the Part 2 approach does not rely on such a docx template. Instead, it relies on html to docx conversion using the GM HTML to DOCX plugin. This also means that the inclusion or exclusion of conditional content in the docx output, depending on what a person enters in the form, is handled via Gravity Forms’ conditional shortcodes and/or the use of conditional fields in the form.
Gravity Forms + GravityWiz’s Gravity Forms OpenAI + GravityWiz’s Populate Anything (optional) + GravityWiz’s Post Content Merge Tags + GravityMerge’s GM HTML to DOCX
Summary of plugin usage
Gravity Forms, Populate Anything, Post Content Merge Tags, and GM HTML to DOCX, are all paid plugins. GravityWiz’s Gravity Forms OpenAI plugin is free.
In a nutshell, these plugins are used for these purposes:
- Gravity Forms: form creation
- Gravity Forms OpenAI: sending a prompt, based on a person’s prior form inputs, to OpenAI and obtaining a response
- Populate Anything: using live merge tags to show the OpenAI response within the form before the form is submitted (thereby enabling immediate review and further prompting if required)
- Post Content Merge Tags: creation of a persistent and secure confirmation page to which HTML content can be passed and that can process Gravity Forms merge tags and conditional shortcodes
- GM HTML to DOCX: creation of the docx download, using a shortcode, and based on the HTML content of the persistent and secure confirmation page.
Detailed walkthrough
In Part 1, we provided a detailed walkthrough that leveraged a simplified version of a form I’ve used in the past. The form is one I created on StopLookGo Privacy, well before the likes of ChatGPT, to get summaries of statutory provisions relating to the collection, use and sharing of information by agencies, into a WordPress database. Each form entry creates a post. In the past, I had to manually write the summary of each statutory provision. Now, with OpenAI and ChatGPT, I can use AI to write the summary, and I can review and edit that summary if I wish before submitting the form entry and getting it into my database of statutory provisions. For the purposes of this walkthrough, I’m also going to make the full and consistently formatted summary available as a DOCX download.
However, this time, we’ll be using html to docx conversion, rather than relying on a pre-existing docx template with merge tags.
As with the walkthrough in Part 1, the full text of a statutory provision can be pasted into the form, with that text being sent off to OpenAI for processing. OpenAI’s summary will populate another field in the form before I submit the form. That workflow will enable me to edit the summary if I need to before submitting it. When the form is submitted, the form entry will create a consistently formatted post and the statutory summary will be immediately available as a DOCX download.
This walkthrough assumes that these plugins have been installed and activated: Gravity Forms, Gravity Forms OpenAI, Populate Anything, Post Content Merge Tags, and GM HTML to DOCX. Note that use of the Gravity Forms OpenAI plugin requires you to enter an API key (which you get from OpenAI) and to have set up a payment mechanism in OpenAI.
Steps 1 to 3 are the same as steps 1 to 3 in the Part 1 approach. I’ll largely repeat them here so you don’t have to go back and forward between posts.
Step 1 – Create your form with the fields you need in the normal way, and a field for your response from OpenAI
Here’s the form I created in the Part 1 walkthrough. It’s identical for this Part 2 walkthrough (I’ve clipped the checkbox field options in the screenshot to avoid the image being too long):

Step 2 – Create a feed with the Gravity Forms Open AI plugin
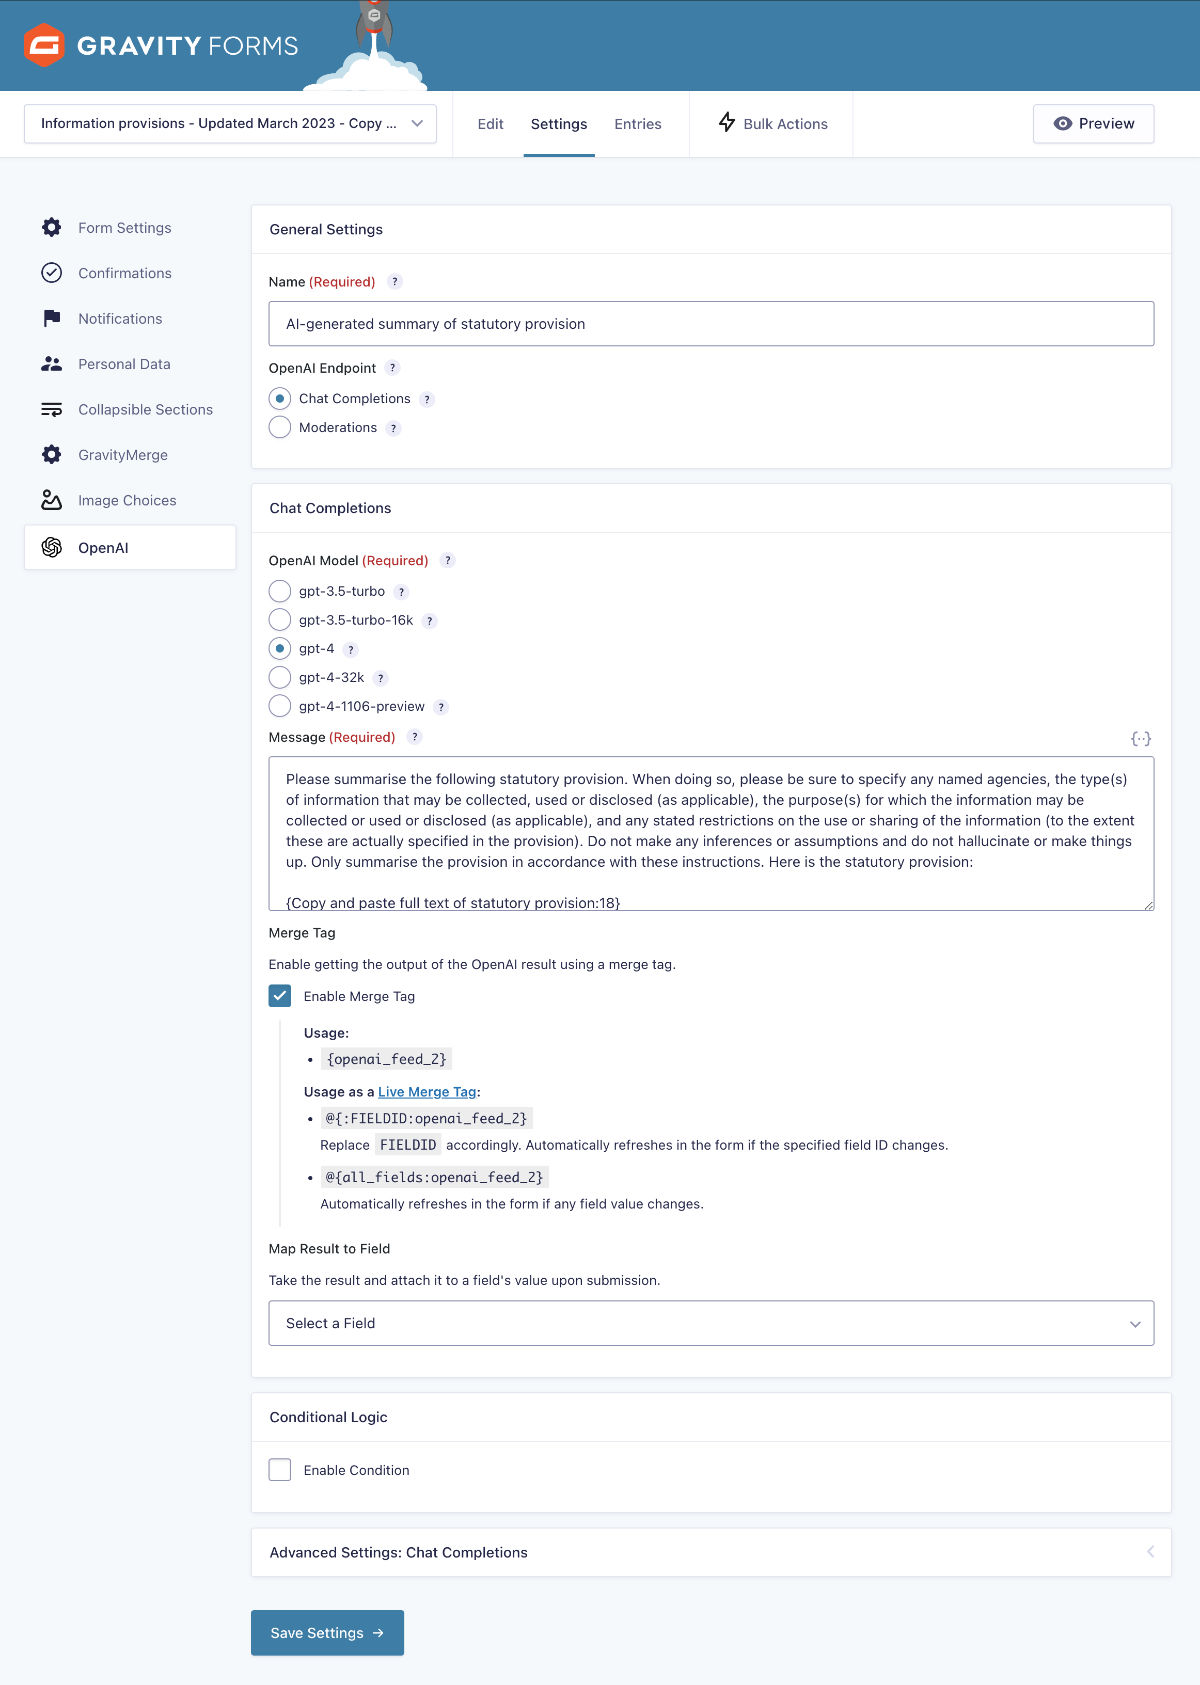
Within the ‘Settings’ for my form, there’s an ‘OpenAI’ option. That’s where we create the feed we need to send a prompt to OpenAI and get a response from OpenAI. Here’s how I’ve set it up:

Step 3 – Use the live merge tag as the default value in a paragraph text field
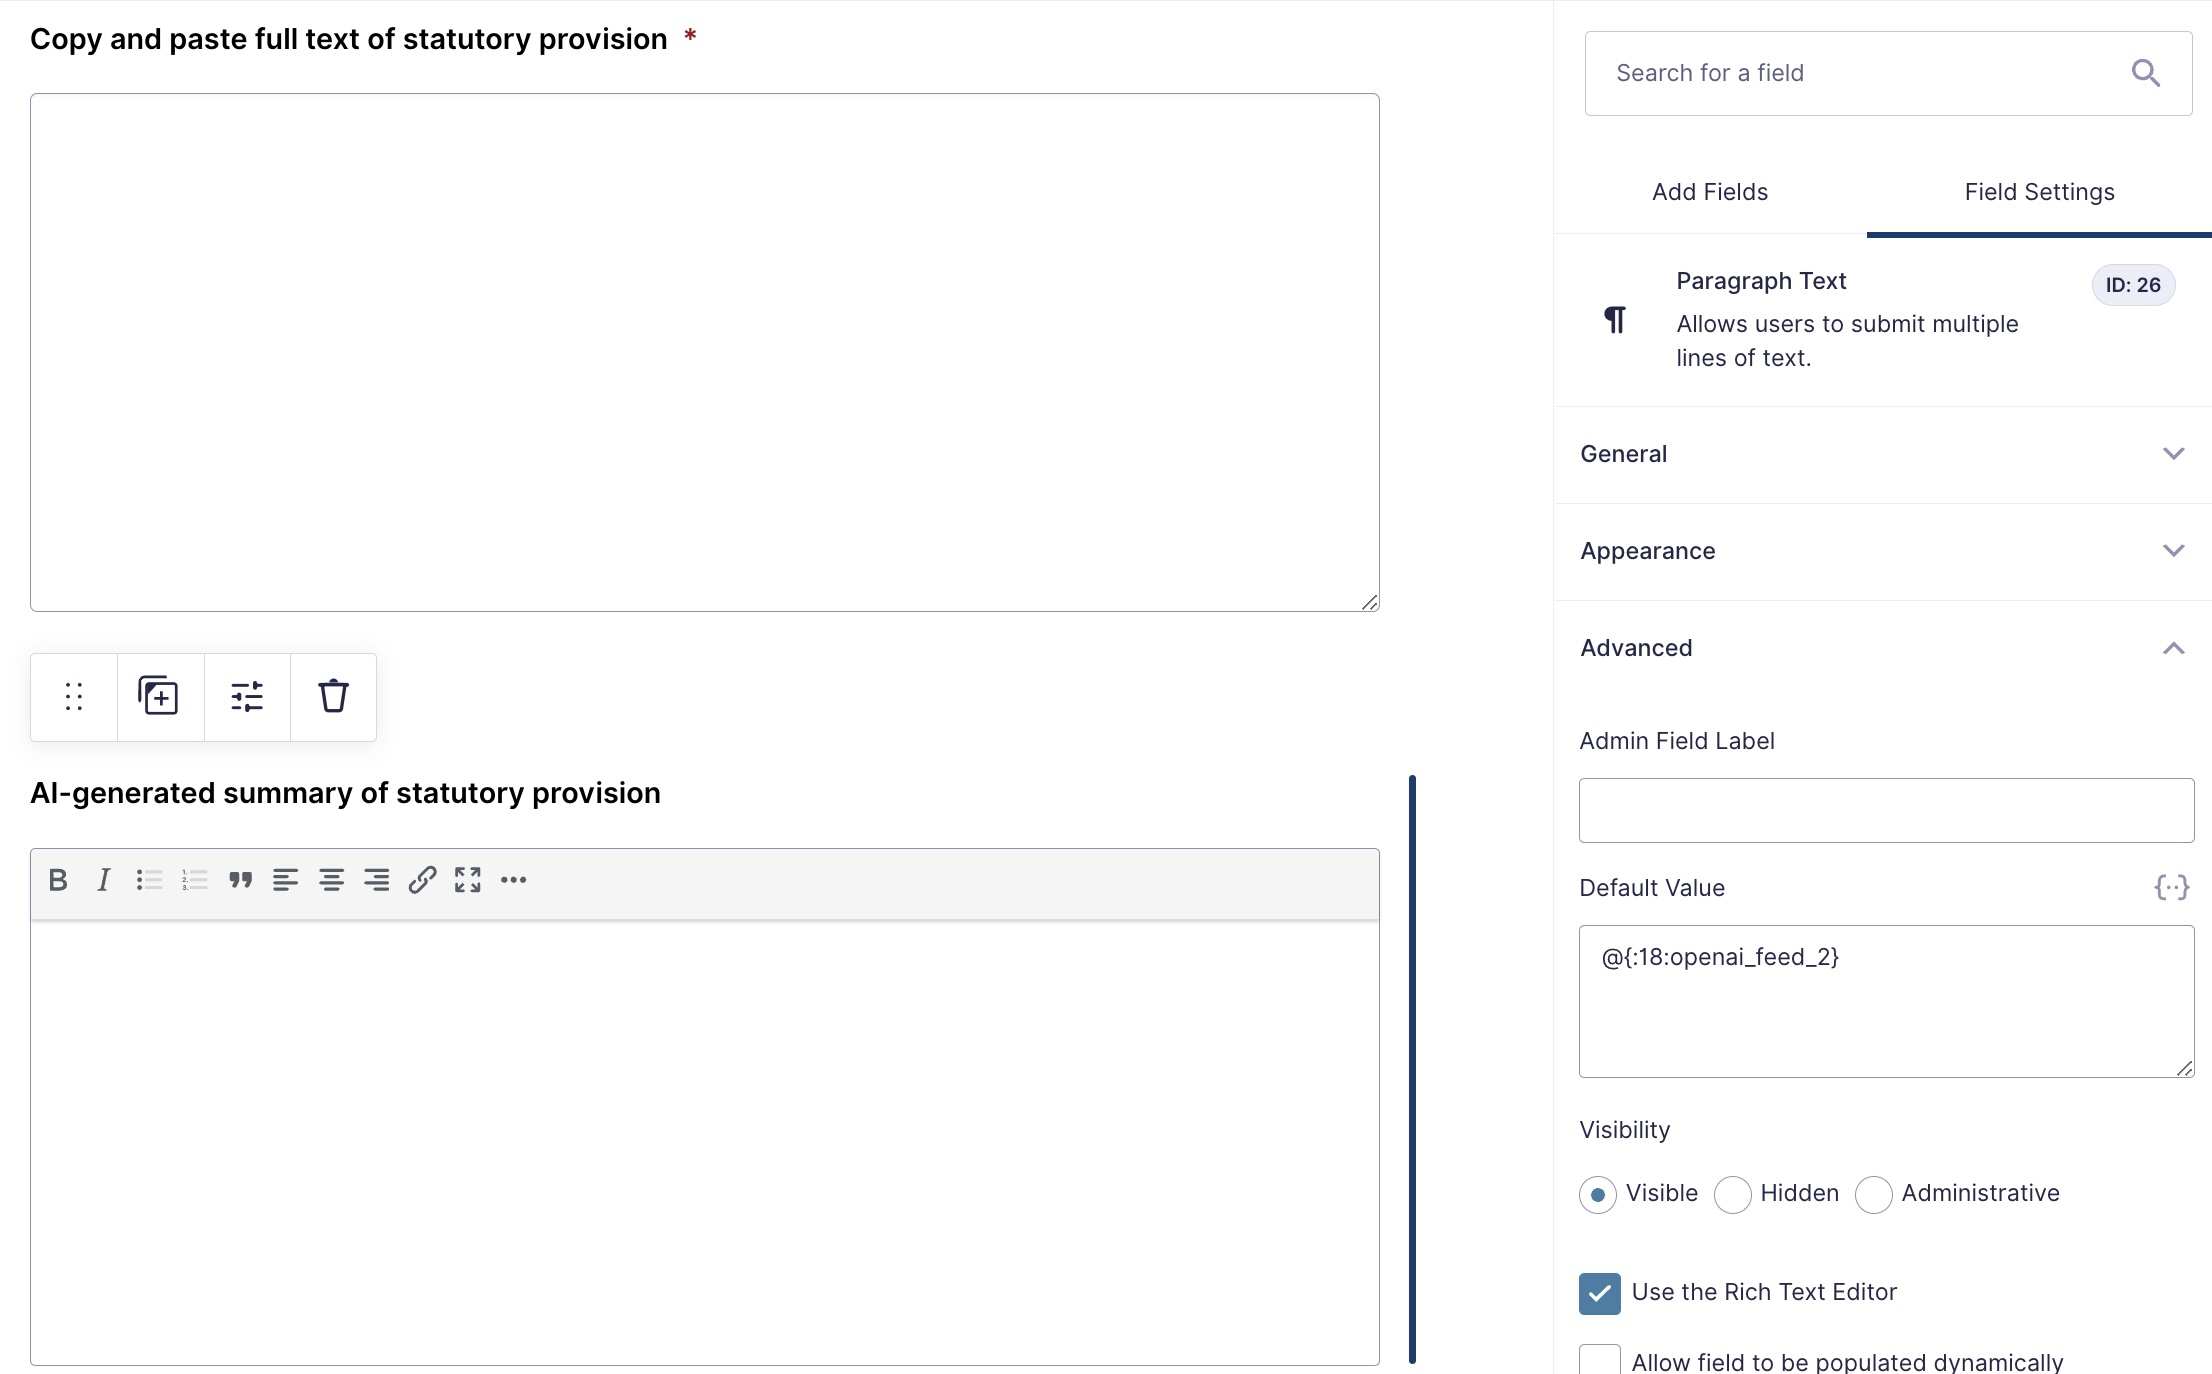
In the screenshot above, you can see we’ve selected the option ‘Enable Merge Tag’. Because we have Populate Anything installed and activated, we can use the merge tag as a live merge tag. In our case, we take the live merge tag ‘@{:FIELDID:openai_feed_2}’, we replace ‘FIELDID’ with ’18’, and we add @{:18:openai_feed_2} as the default value in our second paragraph field (‘AI-generated summary of statutory provision’). We’ve replaced ‘FIELDID’ with ’18’ because 18 is the ID of our first paragraph field into which we copy and paste the full text of the statutory provision. If any change is made to that field, our openAI feed will refresh, thereby sending our prompt to OpenAI and receiving a response. (And here’s a tip: if you don’t like what you first get back from OpenAI, you can have another crack by adding a space to that field.)
This is how things look in the form editor (note that this shows the field settings for our second paragraph field, ‘AI-generated summary of statutory provision’):

By this stage, our form is functional on the front end, in that it will send our prompt to OpenAI and receive a response. However, we still need to work through Steps 4 and 5 to create our templated confirmation page and add our docx download shortcode.
Step 4 – Create a separate page that will act as your persistent and secure form confirmation page, and set your form confirmation to go to that separate page
Create a page with title only at this stage
It’s at step 4 that we depart from the approach in Part 1. The first thing to do is to create a separate page that will act as your persistent and secure form confirmation page. At this point, just give it a title, and publish it.
(Note that we will be relying on Gravity Wiz’s Post Content Merge Tags plugin for the full functionality of this page, including its secure nature. I mention that simply to remind you that we need that plugin for the Part 2 approach.)
This page will become our document template. It serves a similar purpose to the pre-existing docx template used in Part 1, but it’s a template that lives as a page in your WordPress install (rather than as a separate docx template that, in the Part 1 approach, you’d upload to your site using GM Templated DOCX functionality).
Select that page as your confirmation page
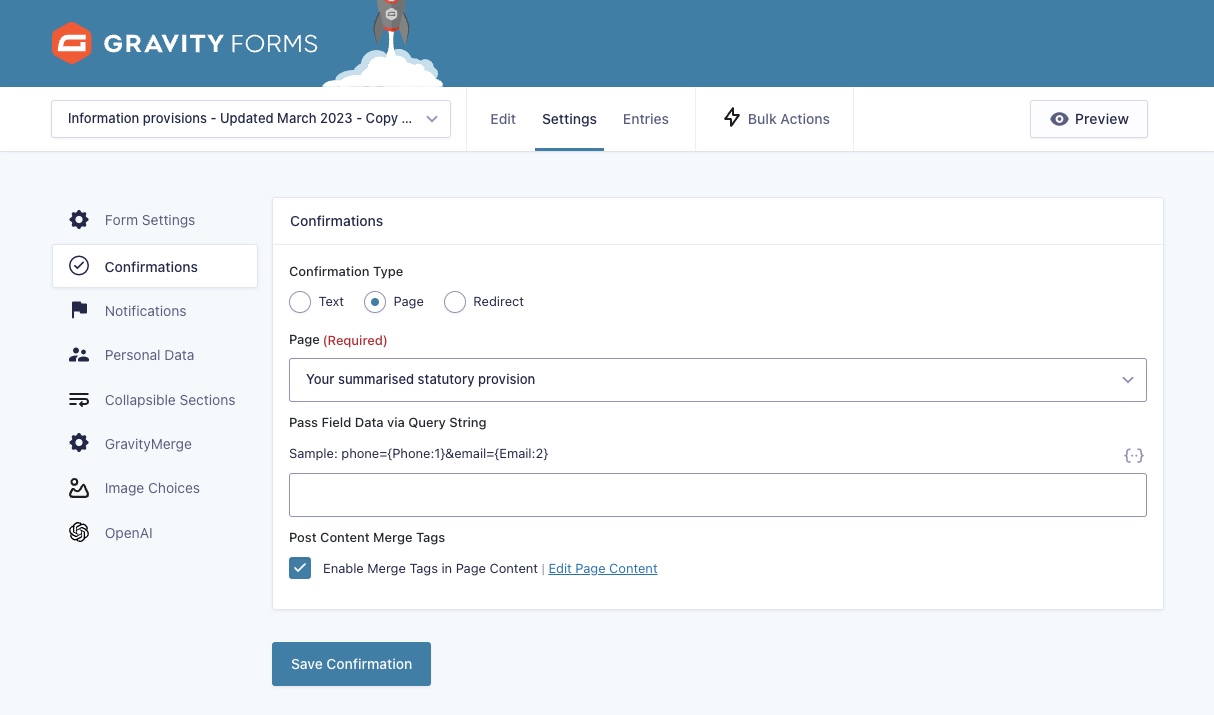
We won’t actually create that template content though until we’ve selected this page as the confirmation page for our form, and selected the ‘Enable Merge Tags in Page Content’ that the Post Content Merge Tags plugin makes available. Here’s how that looks for my form:

Selecting the ‘Enable Merge Tags in Page Content’ option will make a drop down merge tag menu available in the page (which for my demo I’ve called ‘Your summarised statutory provision’):

When you click on the menu, it will show you the field names, and you can insert a merge tag for a given field into your page content by clicking on it:

Add template text to page
Now, because the page serves as our template, we want to add our full templated text and HTML styling to the page, including Gravity Forms merge tags that will be replaced by a person’s form inputs and, if you want to include content conditionally depending on a field input, Gravity Forms conditional shortcodes. (If you’re not familiar with Gravity Forms conditional shortcodes, you can read about them on the Gravity Forms website, and Gravity Wiz has an excellent post that discusses them too.)
Here’s the fairly simple page I’ve created for the purposes of this demo:

As you can see, the template uses standard merge tag functionality to insert a user’s form entries (in the normal, orthodox way) as well as the AI-produced summary of the statutory provision (in the AI way), producing the hybrid approach we were after. It also uses conditional shortcodes so that the ‘Notes’ section will only show if the person completing the form enters something in the ‘Notes’ field.
Step 5 – Add docx download shortcode to your page
To make your automated page content available as a docx download, you need to add the shortcode that the GM HTML to DOCX plugin makes available, as follows:

That’s it! With these steps all in place, our hybrid orthodox+AI document automation is ready to go. Now, when someone completes the form, they’ll be taken to the confirmation page, which will have processed the merge tags and any conditional shortcodes, and they’ll be able to download that page content as a docx file. Here’s a quick demo video showing the automation in action:
