About GravityMerge / GM Templated DOCX
GM Templated DOCX vs GravityMerge
First up, a quick word on the name of this ‘GM Templated DOCX’ plugin. We also call it ‘GravityMerge’, because it’s our original flagship plugin that came before the rest. For this reason, in the documentation you can see here, we refer to the plugin as GravityMerge. ‘GM Templated DOCX’ and ‘GravityMerge’ are different names for the same plugin. Right, now that we have that out of the way, we can get started.
What is GravityMerge?
GravityMerge is a plugin for WordPress, designed to be used in conjunction with Gravity Forms (which needs to be purchased separately from gravityforms.com).* When used with Gravity Forms, GravityMerge enables you to automate the creation of documents in docx format based on inputs a person enters through a form built with Gravity Forms. It does this by merging a person’s form inputs with an underlying Word template. The output is a ‘merged document’ (the underlying template remains as is, for future merges).
* Gravity Forms is (in our view) the leading WordPress forms plugin, produced by Rocket Genius. We are not affiliated with Rocket Genius or Gravity Forms.
What can GravityMerge do?
GravityMerge can do the following:
- It can take the inputs a person enters in a form and insert them in designated places in an underlying Word template. So, for example, if a person is asked to enter his or her name, the name the person enters will replace the placeholder (or merge field) contained in the underlying Word template for a name entry.
- It can use a person’s inputs to trigger the insertion of pre-defined content in the template, using conditional statements. For example, the form might ask: Do you want a confidentiality clause? If the answer is yes, a confidentiality clause will be included in the merged docx document. If the answer is no, it will not.
- It can generate tables of content based on a person’s entries in a Gravity Forms list field. This is a powerful feature. It enables a person entering data in a list field in the form, to enter as many rows as they like. All rows will be included automatically in the merged document.
GravityMerge is the only plugin for WordPress that (together with Gravity Forms) can do all of this within a WordPress installation and without sending data off to a third party service for processing. You don’t need to pay for third party integrations and you don’t need to rely on your data being processed by someone else.
What are some of the ways in which one can use GravityMerge?
You can use GravityMerge to automate the creation of all manner of contracts, confidentiality deeds, policies, letters before action, orders for goods and services, HR documents, proposals, sales pitches, advice documents, and any other document you can think of that has a degree of standardisation while also needing specific user input.
How does the user obtain the merged document?
Depending on how you’ve configured your form’s confirmation page, when a person submits the form, they can download the document or email it to themselves.
Summary of how it works
Once you’ve installed the plugin and figured out what kind of document you want to automate, you do these six things (not necessarily in this exact order):
- Create a new form in Gravity Forms that asks the questions relevant to the content you want inserted in the template Word document.
- Create the Word/docx template, using special merge tags in places where you want the form inputs to either: enter user input; or trigger the insertion of pre-defined content.
- Upload your docx template to your WordPress install, via GravityMerge > Upload Templates.
- Link that docx template with its corresponding form. This is done at the form level, via [form] > Settings > GravityMerge.
- Create a page in WordPress for your form confirmations and then change the default confirmation for your form to go to that page on form submission.
- Create a page or post in WordPress that will contain the form you’ve built (as you usually would when creating any form).
That’s it. Detailed instructions on each of these steps are set out in the next section of the documentation.
Installation
Installing the Gravity Forms and GravityMerge plugins
If you don’t already have the Gravity Forms plugin, you’ll need to purchase a copy from gravityforms.com and install it. GravityMerge will not work without it. Instructions on installing Gravity Forms can be found at the Gravity Forms documentation site.
Before uploading and installing GravityMerge, be sure to back up your site. It’s impossible to test GravityMerge alongside the thousands of themes and plugins that are available for WordPress so, as a matter of good prudent practice, you should back up your site first.
You install the plugin as you would any WordPress plugin. You can do this by:
- uploading the plugin zip file through the WordPress Plugins > Add New area; or
- uploading the extracted plugin folder (the GravityMerge folder) to your WordPress
wp-content/pluginsdirectory, via FTP/SFTP.
In either case, once uploaded, you need to activate the plugin, as you would with any plugin.
How to automate a document
Step 1 – Build your form
Summary: Create a new form in Gravity Forms that asks the questions relevant to the content you want inserted in the template Word document.
Building a form
If you’re not familiar with building forms in Gravity Forms, instructions on how to create your first form can be found at the Gravity Forms documentation site.
Supported fields
GravityMerge supports the following fields: single line text, paragraph text, dropdown, number, checkboxes, radio buttons, date, phone, website, email, list, and consent.
Most useful fields
Usually the most useful fields to use in your form, for document automation purposes, are:
- Single Line Text field: used for short text entries.
- Paragraph Text field: used for multiple line/paragraph text entries.
- Radio Buttons field: used where you want a user to indicate one of two or more alternatives (e.g., do you wish to include a confidentiality clause: Yes / No).
- Checkboxes field: used where you want a user to be able to select one or more items from a list of options (note there are limitations on use of the Checkboxes field, discussed further below).
- List field: used where you want a user to be able to add as many rows of data as needed; you can set a List field to have multiple columns.
These are really the only fields you need for most document automation purposes.
Use unique field names
When you create a field in a Gravity Forms form, you give the field a name. Gravity Forms calls this a ‘Field Label’. For the purposes of GravityMerge, each field name (field label) must be unique. If you create two fields with exactly the same name (field label), GravityMerge won’t know how to process them and your document automation may fail.
Avoid these special characters in field names
The use of any of the following characters in a form field name may cause the merge to fail: ; # ' . Do not use these special characters in field names.
Step 2 – Create your Word/docx template
Summary: Create the Word docx template, using special merge tags in places where you want the form inputs to either (i) enter user input, or (ii) trigger the insertion of pre-defined content (i.e., conditional content).
Create a docx file
In Microsoft Word, create a .docx file. It must be a docx file, not a doc file or any other format.
Three types of merge tags
To understand how to create a template in Word that will be used to build documents based on a user’s inputs, you need to understand three types of merge tags: basic merge tags; conditional merge tags; and table tags, used to create tables where you’ve used a List field in your form.
Basic merge tags
Use basic merge tags to insert content entered into a form field into your document. Basic merge tags are used for a one-to-one mapping between what a user enters in a form field and what is inserted into the document. They take this format:
[onshow.What is your name?]
— where “What is your name?” is the field label exactly as entered in the form.
Example
Your document template might look like:
Dear [onshow.What is your name?]
Thanks very much for contacting us. We look forward to helping you …
[etc]
When a person enters ‘Sarah’, the merged document will read:
Dear Sarah
Thanks very much for contacting us. We look forward to helping you …
[etc]
If a field is left empty
Nothing will appear in the document — the merge tag itself is also removed:
Dear
Thanks very much for contacting us. We look forward to helping you …
[etc]
Formatting
There must be no formatting differences within the content of the basic merge tag in your template, as formatting differences can create breaks in the XML. If you want bold text, bold the entire tag including its brackets:
Dear [onshow.What is your name?]
If you suspect invisible XML breaks, cut the tag and paste it back as unformatted text.
List field / table merge tags
The List field in Gravity Forms lets users add multiple rows. To merge list data into a table in your Word template, create a table with at least two rows (first row for column headings) and use the special table merge tag syntax. Example for a three-column table with field name “Enter the details of your degrees” and columns Degree, University, Year:
| Name | Address | Age |
|---|---|---|
| [a.Name] | [a.Address;block=tbs:row] | [a.Age] |
Conditional merge tags
Used when you only want certain content to appear in the merged document if a particular condition is met. The syntax is:
[onshow;block=begin;enlarge=tbs:p;when [Are you building a privacy statement for a website or for something else?] == Website]]
This statement explains how we handle the personal information we collect when you use this website.
[onshow;block=end;enlarge=tbs:p]
You can also use != (does not equal) to insert content when an answer is NOT a certain value:
[onshow;block=begin;enlarge=tbs:p;when [Are you building a privacy statement for a website or for something else?] != Website]]
This statement explains how we handle the personal information we collect when you contact us by phone.
[onshow;block=end;enlarge=tbs:p]
A basic merge tag can be used inside a conditional block:
[onshow;block=begin;enlarge=tbs:p;when [Are you building a privacy statement for a website or for something else?] == Website]]
This statement explains how we handle the personal information we collect when you use this website, [onshow.Enter the URL of your website]. When the user enters the URL, it will appear in the merged document.
[onshow;block=end;enlarge=tbs:p]
You can also test whether a field is empty or not empty using == '' (equals nothing) or != '' (does not equal nothing):
[onshow;block=begin;enlarge=tbs:p;when [How to deal with technical faults or corrupted data]!='']
[onshow.How to deal with technical faults or corrupted data]
[onshow;block=end;enlarge=tbs:p]
[onshow;block=begin;enlarge=tbs:p;when [How to deal with technical faults or corrupted data]=='']
The chapter on how to deal with technical faults is not relevant to your needs.
[onshow;block=end;enlarge=tbs:p]
Checkbox fields
Where a user selects more than one option in a checkbox field, the answer is the combination of selected options. Conditional merge tags can be used with checkbox fields.
Simple lists
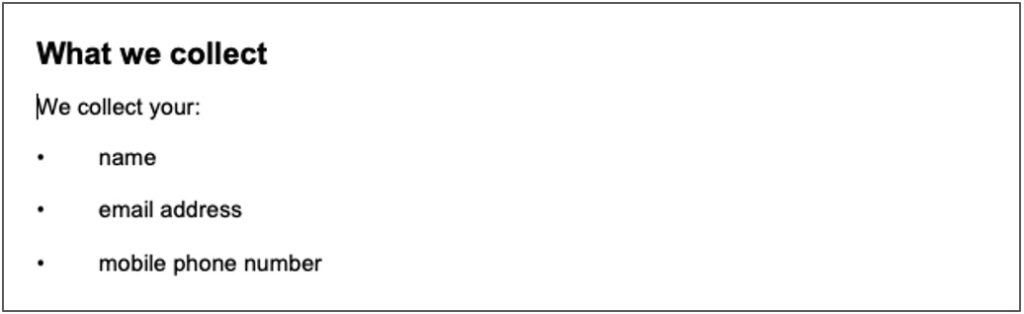
Let’s say you have a checkbox field with multiple options and you want to include a list of the selected options in your merged document. For example, a simple “What do we collect?” section:
Let’s say you want your merged document to display like this (with the bullet point items being those selected by the user in the form):
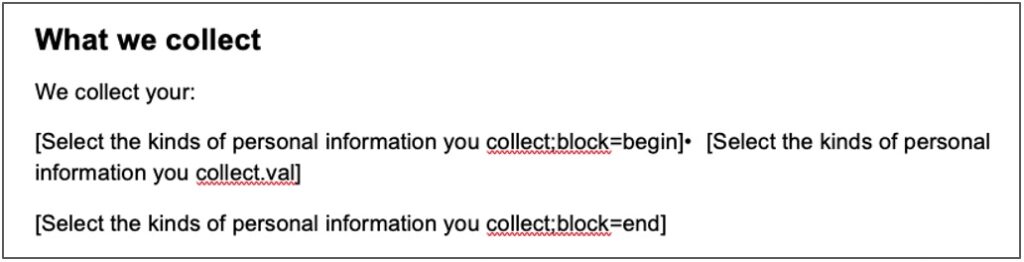
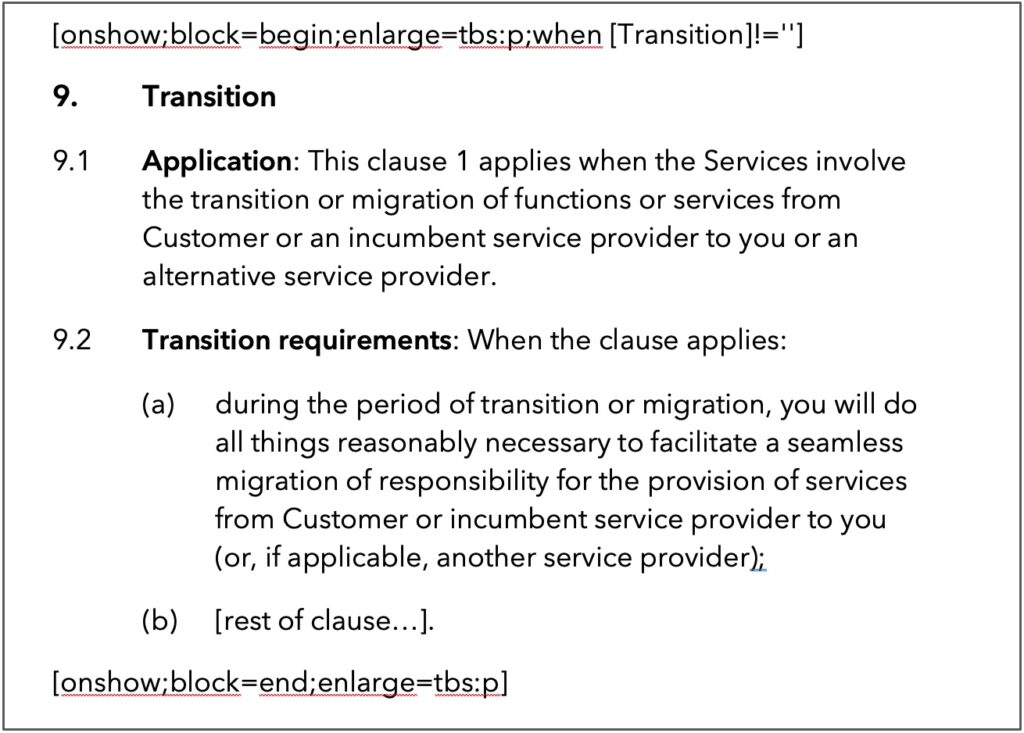
This is what you would put in your template:
Conditional clause options with checkboxes
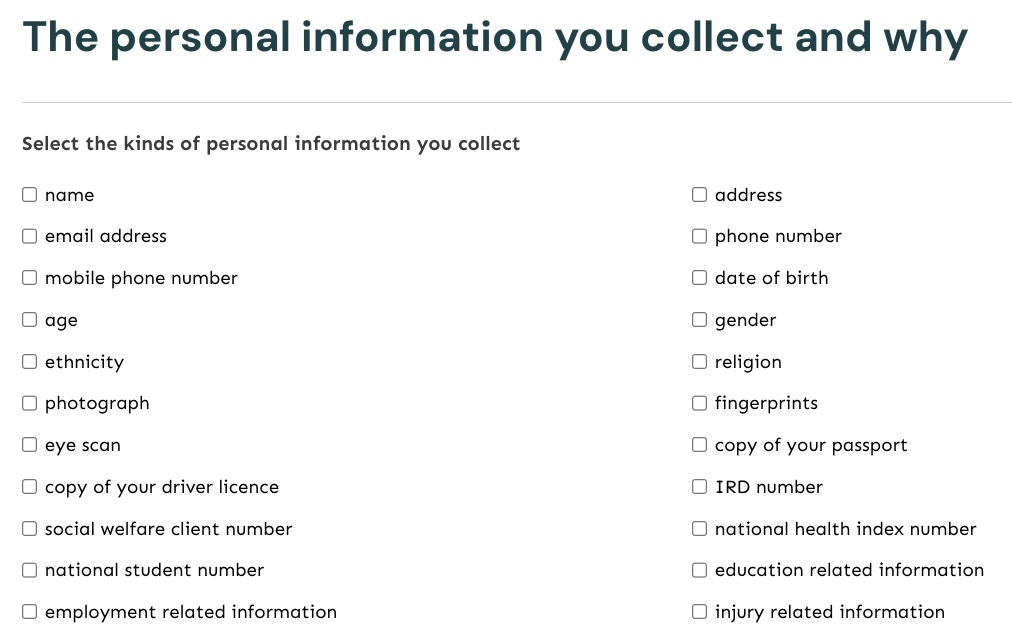
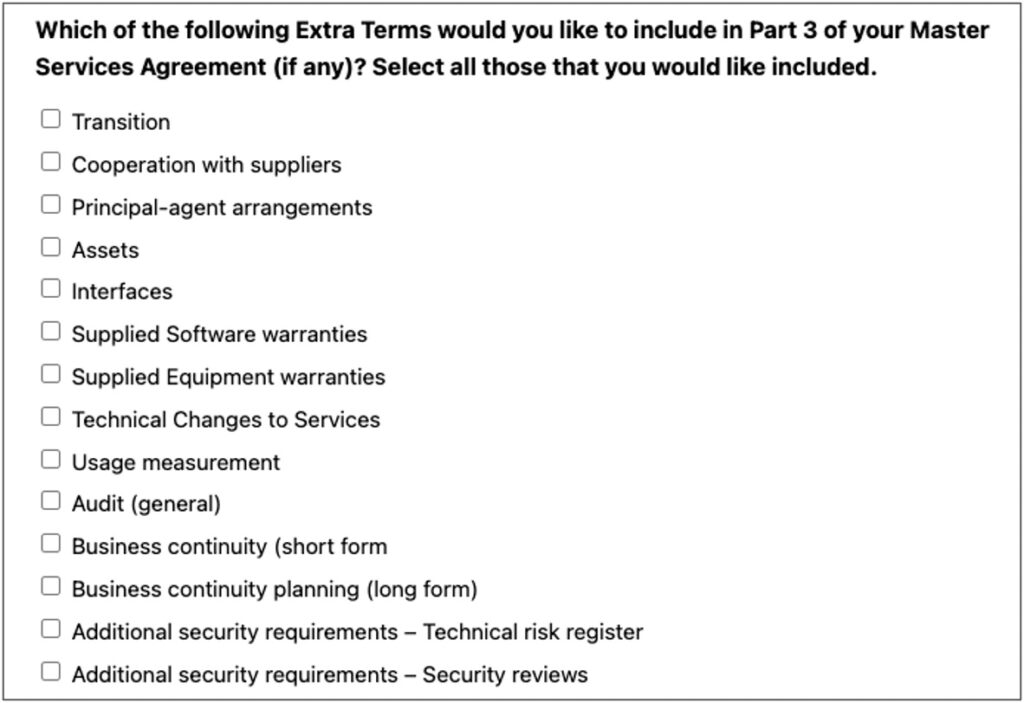
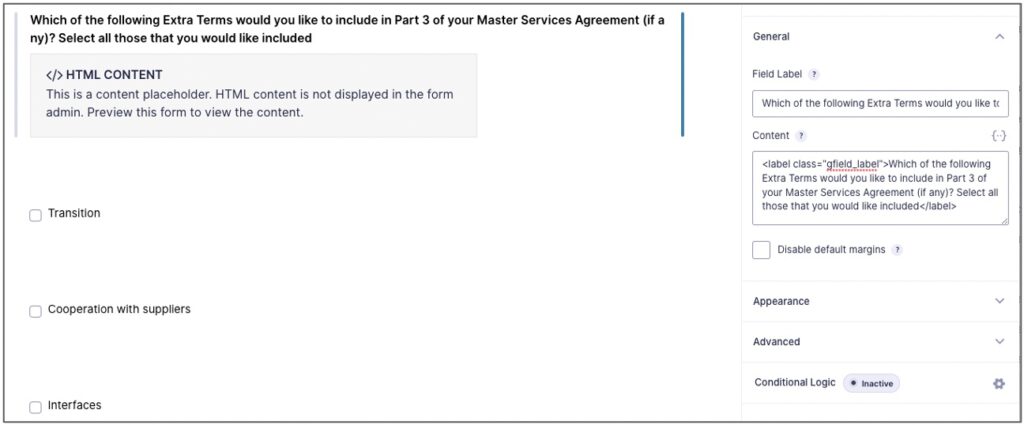
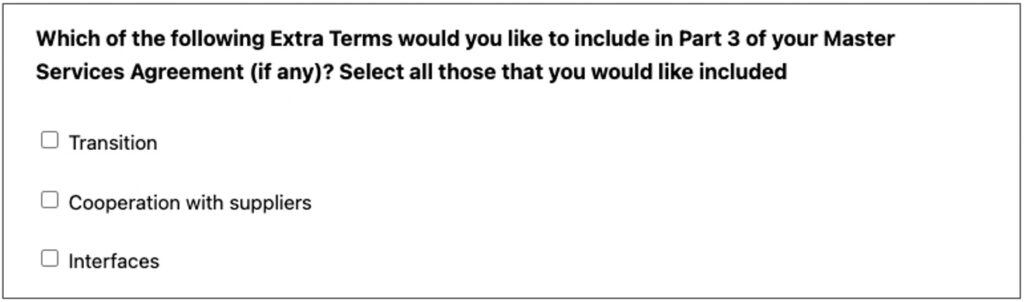
There can be situations where you want to use checkboxes in your form to ask people if they want certain clauses included in their document. For example:
The first screenshot shows four fields: an HTML field, and three checkbox fields (with the field labels redacted):
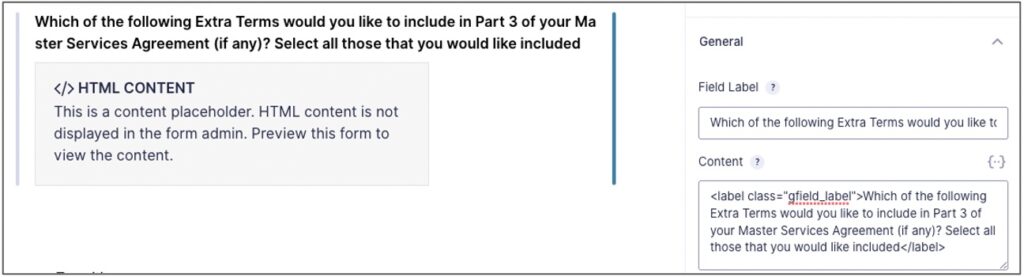
This next screenshot shows, in a closer-up view, the label class you can use for your HTML field to achieve the heading style shown:
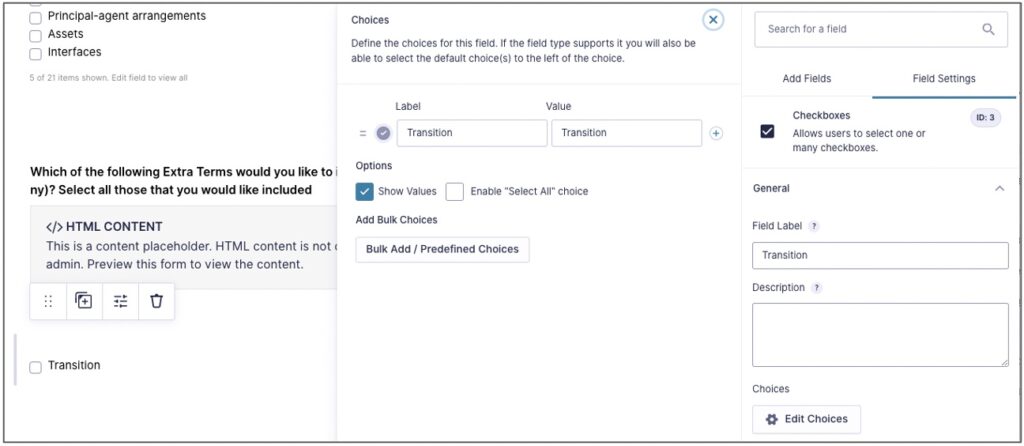
The following screenshot shows how one of the checkbox fields is set, in terms of it having a Field Label:
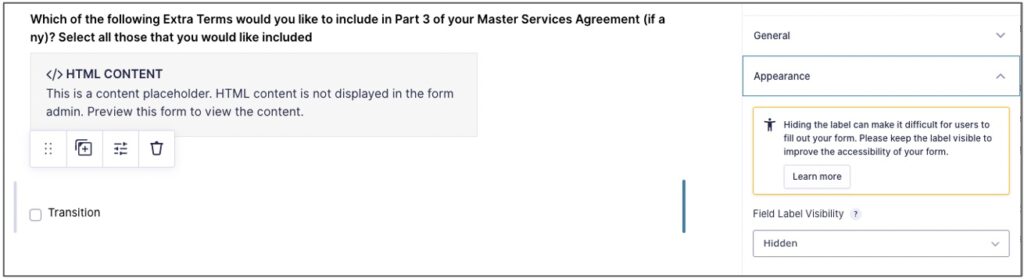
This screenshot shows how the checkbox field’s ‘Field Label Visibility’ is set to ‘Hidden’:
This screenshot shows how the four fields look on the front end:
To test against the individual checkbox fields in your template, use syntax like this — where Which fruit do you like? is the Field Label of the checkbox field, and Apples, Oranges and Peaches are the individual checkbox choice labels:
Which fruit do you like?
[  ] Apples
[  ] Oranges
[  ] Peaches
Step 3 – Upload your docx template to GravityMerge
Summary: Once you’ve created your form and your docx template, you need to upload your template to GravityMerge.
Process
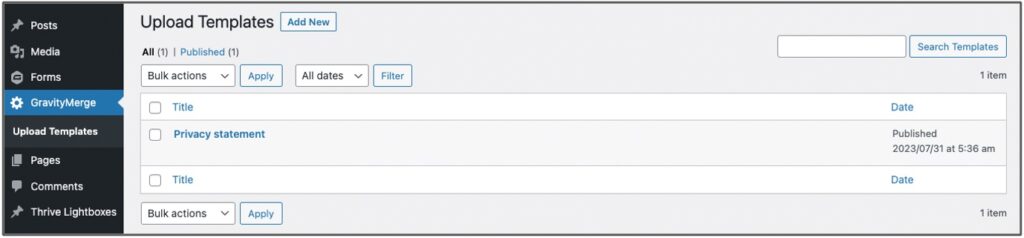
To upload your template, navigate to the GravityMerge > Upload Templates area, and press the ‘Add New’ button.
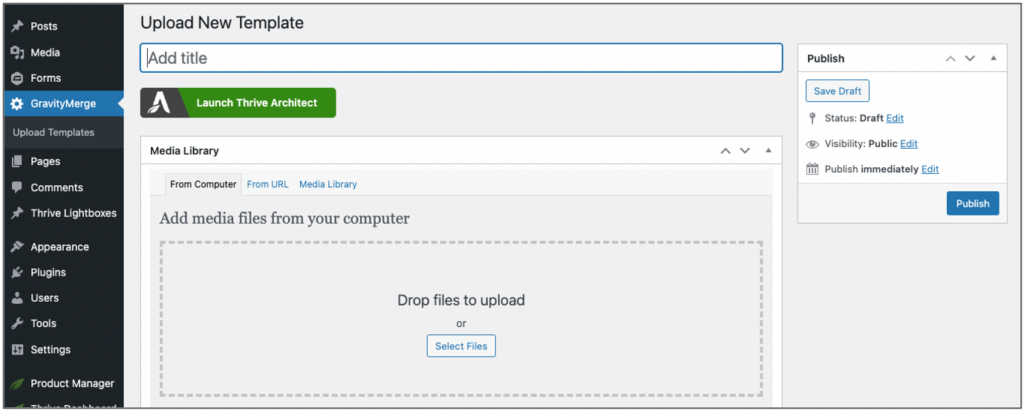
Once you’ve done that, you give your template a title (which can be the same as or different to your actual template file name), upload your template docx file from your computer, and press Publish.
Step 4 – Link your Word/docx template to your form
Once you’ve created your form and your docx template, and uploaded your template to GravityMerge, you need to link your template to your form. This is done at the form level, via [Form] > Settings > GravityMerge.
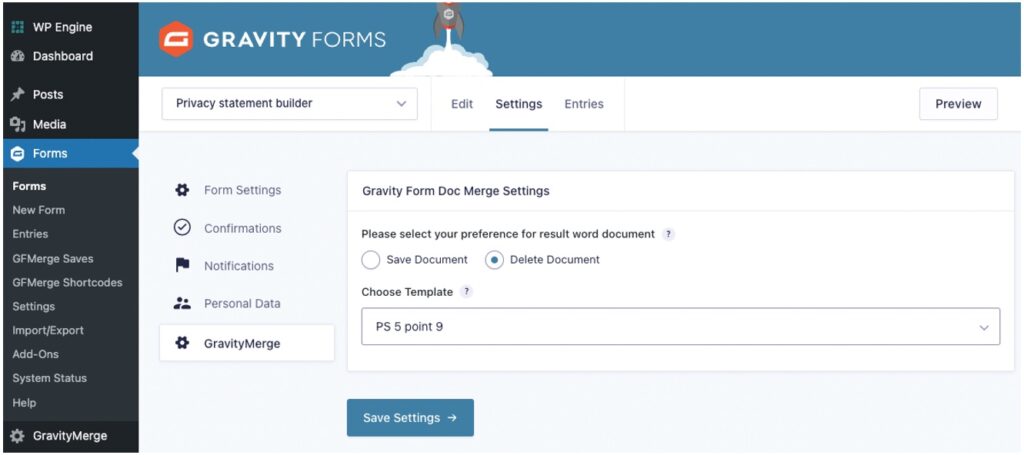
When linking/choosing your template, you can select whether to have your merged document saved (in which case you’ll find them in the Forms > GFMerge Saves area) or deleted automatically once you’ve downloaded or emailed them.
Step 5 – Decide whether to use the default confirmation page or create your own
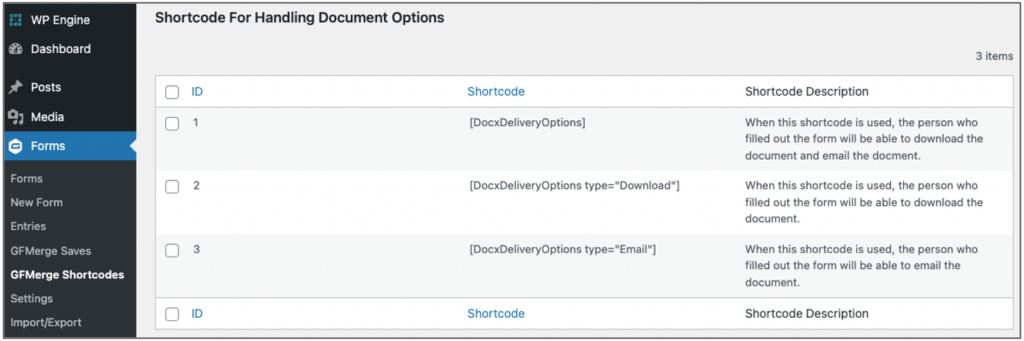
When a person submits a form that is linked to a template, they need to be taken to a confirmation page that contains the document download and/or email options. There are three available shortcodes for these options, which can be found at Forms > GFMerge Shortcodes.
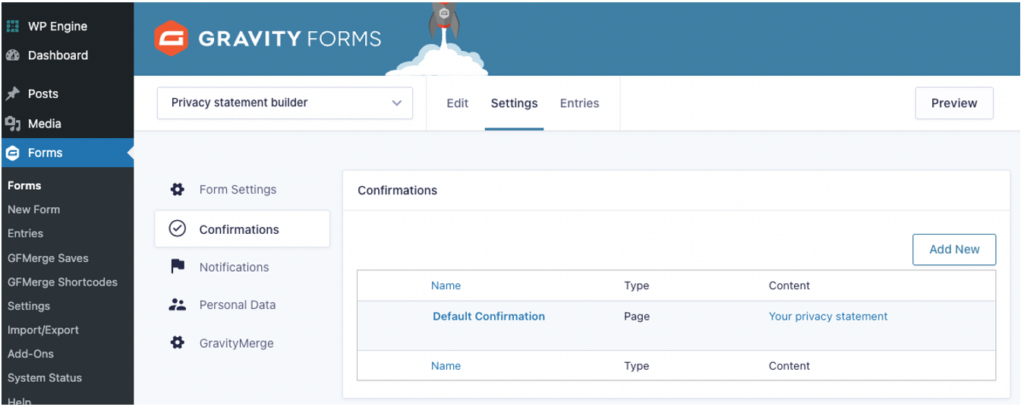
This requirement means that you need to set a confirmation page for your form, in the [Form] > Settings > Confirmations area (this is a Gravity Forms form setting, not a GravityMerge setting).
When you activate GravityMerge, the plugin automatically creates a page called ‘Gravity Merge Confirmation’ that contains the default shortcode option of:.

You can use this page as your form confirmation page, or you can create your own page and add your preferred shortcode to it.
In either case, you need to edit the settings for the default confirmation by selecting a confirmation page that contains the GravityMerge shortcode in the [Form] > Settings > Confirmations area, like this (in this example, the confirmation page that’s been set up is called ‘Your privacy statement’)

Step 6 – Create a page or post in WordPress that will contain the form
Creation process
You do this as you would when creating any WordPress page that contains a Gravity Forms form. For example, if you’re using the block editor, you’d add a Gravity Forms block, select your form, adjust its settings as required, and then publish the page.
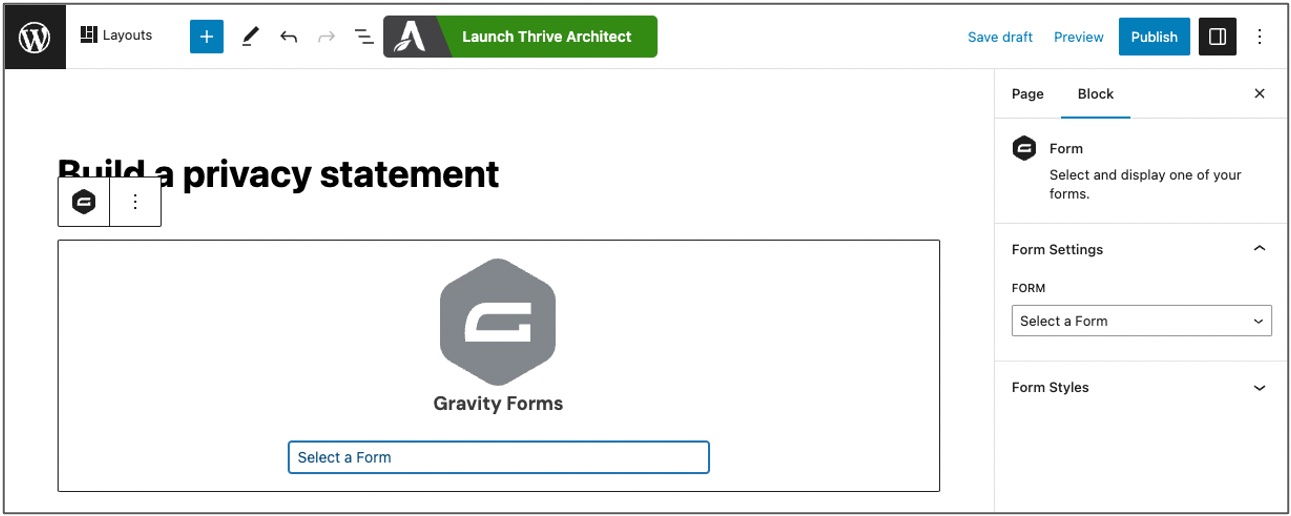
Now, when anyone who is able to access that page visits it, they’ll be able to fill out your form and obtain the merged document.

Access control
If you want to restrict access to the page, you can:
- password protect it using standard WordPress page settings;
- use a membership or restricted content plugin; or
- select the ‘Require user to be logged in’ setting for your form (a standard Gravity Forms option in the Form Settings).
Understanding security
Saving or deleting merged documents
The basic security settings relating to saving or deleting merged documents have been described earlier in section 3.4.
Gravity Forms entries
You also need to appreciate that a form’s inputs are stored as entries in your database, separately to any merged document that may be created out of them. As such, selecting the ‘Delete Document’ option in [Form] > Settings > GravityMerge will delete the merged document, but the form entry will still exist.
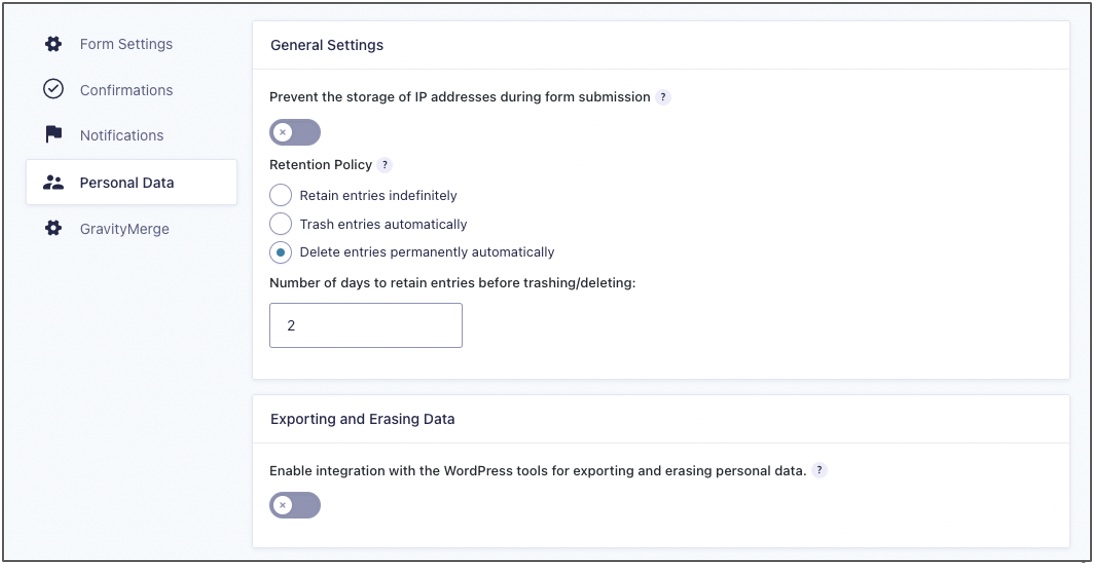
If you wish to delete the form entries as well, you can set a data retention policy for your form in the [Form] > Settings > Personal Data area. For example, you can configure entries to be retained for a set number of days and then deleted permanently and automatically. For more information on these settings, see the Gravity Forms documentation on personal data settings.
Security of template URLs and merged document URLs
Subject to what is said below, template documents, and merged documents that are saved rather than deleted, will be accessible via their URLs by anyone who has the URL. GravityMerge adds a random number string to each merged document name to prevent people being able to guess URLs but, despite this, you should treat merged document URLs as akin to a password.
As an added security feature, you can ensure that only logged-in users are able to access templates and merged documents at their URLs. How this is done depends on your server type:
- Apache server: GravityMerge deals with this automatically via a change to the
.htaccessfile (you may still wish to check that the automatic change is effective). - NGINX server: You will need to ask your webhost to add the following rule to the server configuration:
location ~* \.(pdf|doc|docx|zip)$ {
    if ($http_cookie !~* "wordpress_logged_in") {
        return 403;
    }
}
Common questions
Does GravityMerge send data to any third party service?
No it doesn’t. All data handling is done by WordPress itself. This is one of the reasons we built it. We wanted a document automation solution for the world’s leading CMS that didn’t depend on third party services.
Are the merged documents stored in a WordPress directory or deleted once merged?
We’ve designed the plugin to give you the option to either save the merged documents within your WordPress installation or have them deleted once the documents are downloaded or emailed. See the discussion of settings at section 3.4.
Can I manage merged documents from my WordPress dashboard?
This depends on whether, in the form’s GravityMerge settings, you’ve selected the option for merged documents to be saved or deleted. If you’ve selected the save option, you can download merged documents from the Forms > GFSaves area and you can also delete them there if you no longer want or need them.
Are there any hosting issues I should be aware of?
Yes, specifically in relation to what are known as “transferable sites” on WPEngine. “Transferable sites” are developer sites that sit behind two layers of password protection until transferred to the client.
GravityMerge works as expected on normal installations of WordPress on WPEngine. It also works on transferable sites, but one feature does not work on transferable sites: if you have your Form > Settings > GravityMerge set to ‘Delete Document’ (instead of ‘Save Document’), the merged document will not be available for download and will produce a browser error such as “File wasn’t available on site”. You can still email the document, but downloads will not work when set to ‘Delete Document’. Downloads do work if set to ‘Save Document’.
This issue appears to be unique to transferable sites, and does not occur with normal installations on WPEngine.