Summary
Create the Word docx template, using special merge tags in places where you want the form inputs to either (i) enter user input, or (ii) trigger the insertion of pre-defined content (i.e., conditional content).
Create a docx file
In Microsoft Word, create a .docx file. It must be a docx file, not a doc file or any other format.
Three types of merge tags
To understand how to create a template in Word that will be used to build documents based on a user’s inputs, you need to understand three types of merge tags:
- basic merge tags;
- conditional merge tags; and
- table tags, used to create tables where you’ve used a List field in your form.
Each of these is now explained.
Basic merge tags
Use basic merge tags to insert content entered into a form field into your document
Basic merge tags are used for a one-to-one mapping between what a user enters in a form field and what is inserted into the document. They take this format and they are best used in conjunction with Single Line Text fields and Paragraph Text fields in your form:
[onshow.What is your name?]In the example above, “What is your name?” is the name you gave to the Single Line Text field in your form (i.e., its field label). Your field name/label as entered into the merge tag must be exactly as it is in the form, and it must follow the example above. If there’s not a 100% match, e.g, if you make a typo or forget a question mark you’ve used in the form or something like that, your document automation may fail.
Example
Your document template, with a basic merge tag, might look something like this:
Dear [onshow.What is your name?]
Thanks very much for contacting us. We look forward to helping you …
[etc]
What happens when a person completes the form field
When a person fills out the form and has a document built, the name they enter into the “What is your name?” field will replace the merge tag in the template.
So, if a person enters ‘Sarah’, the merged document will look like this:
Dear Sarah
Thanks very much for contacting us. We look forward to helping you …
[etc]
What happens when a person leaves the form field empty
If nothing was entered into the field, nothing will appear in the document and you will not see the merge tag either. In other words, you’d see this:
Dear
Thanks very much for contacting us. We look forward to helping you …
[etc]
Importance of consistent formatting
There must be no formatting differences within the content of the basic merge tag in your template, as formatting differences can create breaks in the XML that produces the Word document and that, in turn, can cause merging errors. So, for example, if you wanted the content of a basic merge tag to be bold, you would place the entirety of the tag and its content in bold. For example:
Dear [onshow.What is your name?]
Sometimes XML breaks are not visible to the human eye. If you suspect this is happening, and if you’re sure that you’ve entered the field name correctly into the merge tag, try cutting the merge tag from your document and then pasting it back in as unformatted text.
How to use the List field to insert tables into your document
The List field in Gravity Forms is a powerful type of field because it can be used to collect multiple rows of information, with the user determining how many rows of data they wish to enter. In addition, when creating your form, you can configure a list field to have multiple columns per row. For basic information on this field type, see the Gravity Forms documentation at https://docs.gravityforms.com/list/
To merge data a user enters into a List field in your form, into a table in your Word template, you need to follow this approach:
- create a table with at least two rows in your form (the first row will be for the column headings)
- use the special merge tags in the example below in your table, but with your own field name.
Example (of a three column table)
In this example, the question in the form is “Enter the details of your degrees” and there are three columns in the list field, for Degree, University and Year:
| Name | Address | Age |
| [a.Name] | [a.Address;block=tbs:row] | [a.Age] |
To replicate this in your own Word template, take the approach above but replace the field name/label (Enter details of your degrees) with your own field name/label. Everything else should be the same.
Conditional merge tags
Inserting content into your document if a condition is met
Conditional merge tags are used when you only want certain content (e.g., a paragraph or clause) to appear in your merged document if a particular condition is met. In other words, whether that content appears depends on the answer the user gives to a particular field/question in the form.
Merge tags to use
To do this, you need to use the following kind of merge tags (in the example below, the condition is checking against a radio button field where the possible answer to the question is either ‘Website’ or ‘Something else’):
[onshow;block=begin;enlarge=tbs:p;when [Are you building a privacy statement for a website or for something else?] == Website]]
This statement explains how we handle the personal information we collect when you use this website.
[onshow;block=end;enlarge=tbs:p]
You can also insert content if answer is not the one you’re testing against
You can also have conditional content inserted into the merged document if an answer in the form field is not one you’re testing against in the condition. So, for example, the tags below will insert the conditional content if the answer is not Website. The only change in the tags from what you see above is that =’Website’ has been changed to !=’Website’. != means does not equal.
[onshow;block=begin;enlarge=tbs:p;when [Are you building a privacy statement for a website or for something else?] != Website]]
This statement explains how we handle the personal information we collect when you contact us by phone.
[onshow;block=end;enlarge=tbs:p]
Note also that you can use a basic merge tag within conditional merge tags. For example:
[onshow;block=begin;enlarge=tbs:p;when [Are you building a privacy statement for a website or for something else?] == Website]]
This statement explains how we handle the personal information we collect when you use this website, [onshow.Enter the URL of your website]. When we use the terms we, us or our, we are referring to [onshow.What is the full name of your agency or organisation?].
[onshow;block=end;enlarge=tbs:p]
In the example above, the paragraph commencing “This statement explains…” is only included if the person completing the form has selected ‘Website’ when asked if they’re building a privacy statement for a website or something else. If the paragraph is included, then the syntax “[onshow.Enter the URL of your website]” will be replaced by the URL the person entered in the form.
Important notes about opening and closing tags
Note that, in each of the examples above, there is an opening tag and a closing tag. The content you want inserted into the merged document if the condition is met is in between these two tags. The opening tag must be a separate line/paragraph and the closing tag must be a separate line/paragraph (they are both removed from the template on merging). You need to follow the pattern of the example merge tags above exactly. For the starting merge tag, the only things you will change are the name of your field and the condition (answer) that triggers insertion of the conditional content. You will not (and must not) change the closing tag at all.
You can insert conditional content depending on whether a field is empty or not
In the example above, the tags are checking for whether a specific answer was given in the form, that is, the conditional content will only be inserted into the merged document if the answer to the question was Website. You can also create conditions that depend on whether there is any answer to a given question (field in your form) or not.
For example, the conditional tags below are asking whether there is an entry in the text field called “How to deal with technical faults or corrupted data”. The first tag, which uses the condition !=”, is asking whether the field is not empty. This is because != means does not equal and ” means nothing or empty. So, if the field is not empty, the actual content of the text field will be inserted into the merged document (that’s what the basic merge tag [onshow.How to deal with technical faults or corrupted data] does). The second conditional opening tag ([onshow;block=begin;enlarge=tbs:p;when [var.How to deal with technical faults or corrupted data]=”]) is asking whether the text field is empty. If it is, then the alternative text (No particular requirements specified at Start Date.) will be inserted into the merged document.
[onshow;block=begin;enlarge=tbs:p;when [How to deal with technical faults or corrupted data]!='']
[onshow.How to deal with technical faults or corrupted data]
[onshow;block=end;enlarge=tbs:p]
[onshow;block=begin;enlarge=tbs:p;when [How to deal with technical faults or corrupted data]='']
No particular requirements specified at Start Date.
[onshow;block=end;enlarge=tbs:p]
Do not repeat exactly the same conditional marge tag and condition
Do not replicate the same conditional merge field, testing against the same condition, more than once in a document. Doing this may cause your merges to fail.
Important notes regarding checkbox fields
Checkbox fields enable a user to select one or more of the available options listed in the field. It’s important to understand that, where a user selects more than one option, the answer to the form field question is actually the combination of the selected options. This has significant implications for how checkbox fields can be used. For example, take this checkbox field:
Which fruit do you like?
[  ] Apples
[  ] Oranges
[  ] Peaches
Conditional merge tags cannot be reliably used with this checkbox field to insert an answer if ‘Apples’ is selected, regardless of whether ‘Oranges’ and/or ‘Peaches’ are selected.
There are only two situations in which checkboxes can be reliably used: simple lists, and conditional content depending on whether a checkbox item has been selected (with one checkbox field in your form per item).
Simple lists: Let’s say you have a checkbox field with multiple options and you want to include a list in your merged document of the items a person has selected in the form. For example, the checkbox field in your form might be something like this:
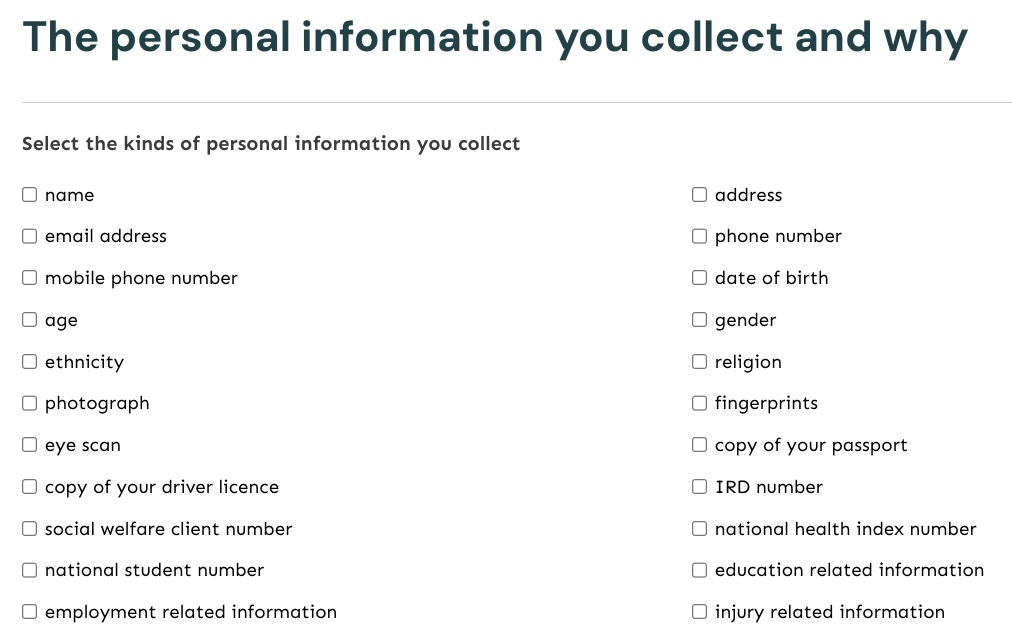
Let’s say you want your merged document to display like this (with the bullet point items being those selected in the form):
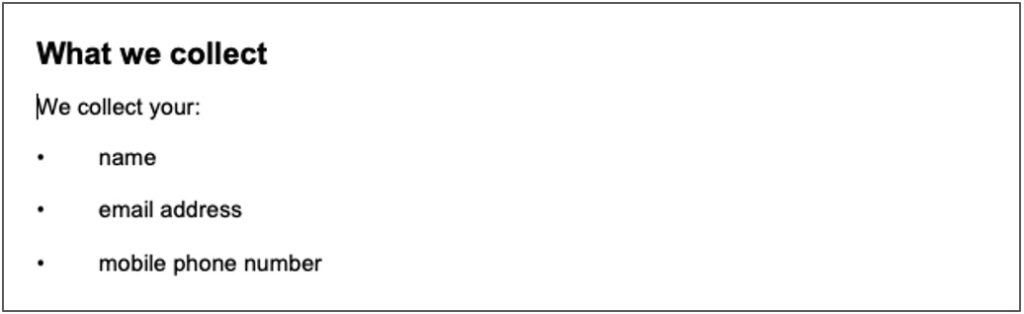
This is what you would put in your template:
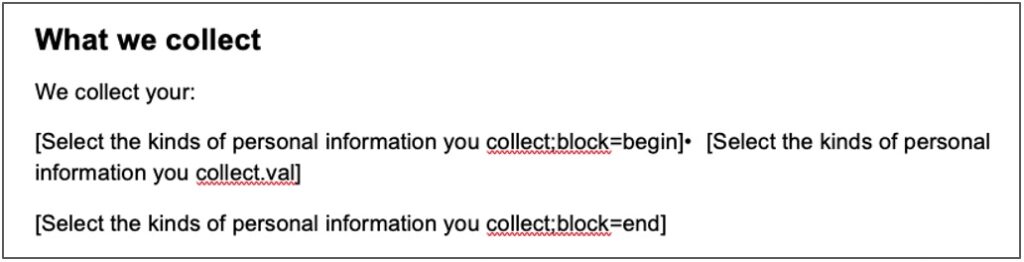
(Note that the bullet point is an inserted bullet point symbol. It is not a bullet point using Word’s ‘bulletpoints’ button/feature. Using that feature will not work, as there’d be too much line spacing.)
Conditional content depending on whether a checkbox item has been selected (with one checkbox field in your form per item)
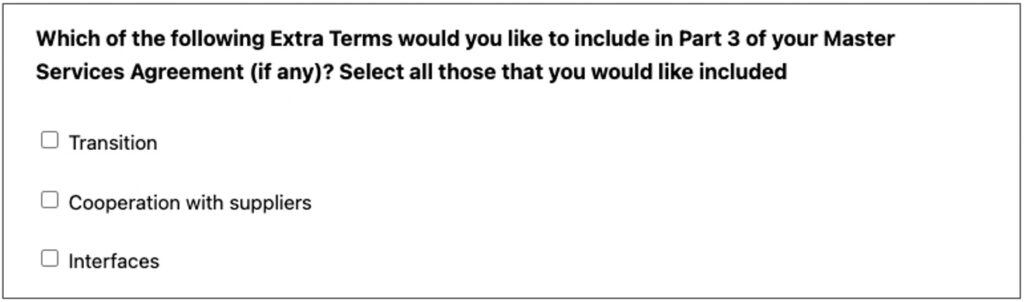
There can be situations where you want to use checkboxes in your form to ask people if they want certain content in their merged document, but where the content is not a one-to-one wording match with the checkbox items. For example, you might ask a person if they want particular kinds of clauses in a contract, like this:
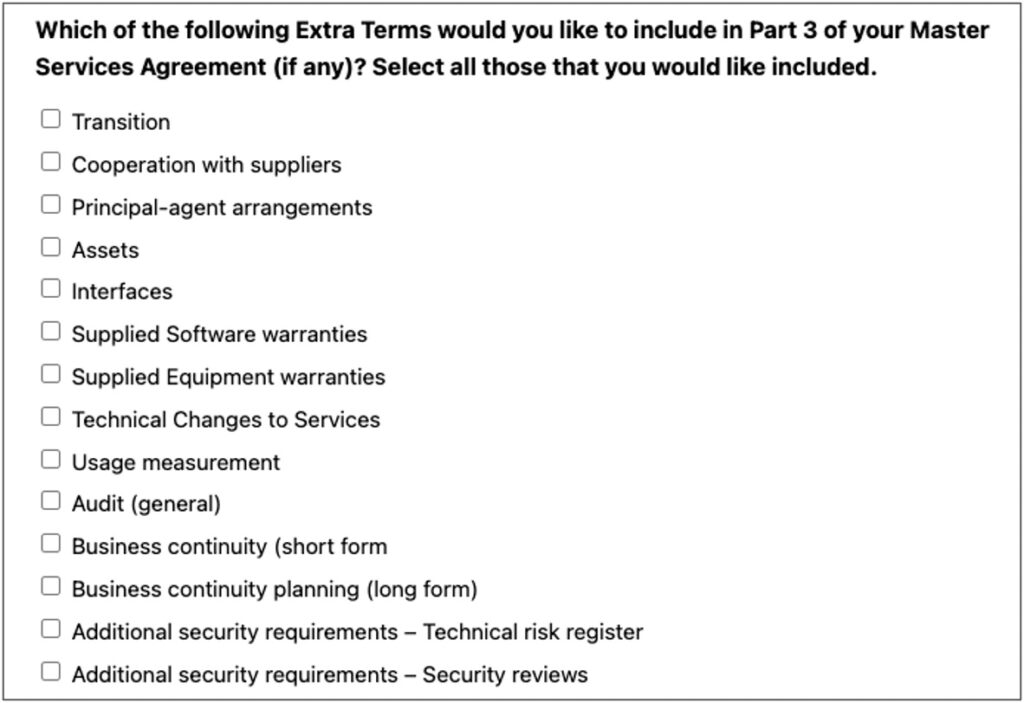
When a person selects one or more of these items, full multiline or multi-paragraph contract clauses would be inserted into the merged document.
You cannot use a single checkbox field to achieve this result. Instead, to achieve this result with a layout like that above, you can use an HTML field to pose the question, and then an individual checkbox field for every individual option, and – for each checkbox field label – you set the ‘Field Label Visibility’ to ‘Hidden’.
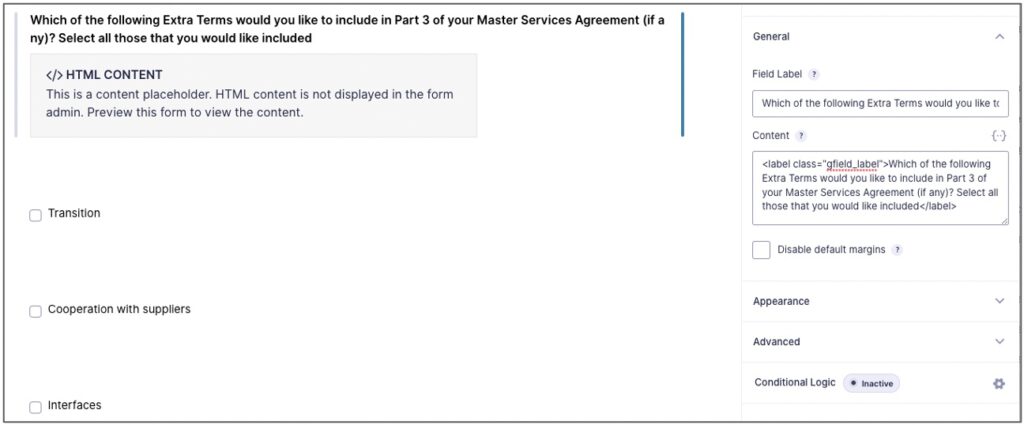
The following series of screenshots show how this is done.
The first screenshot shows four fields: an HTML field, and three checkbox fields (with the field label visibility of each set to hidden):
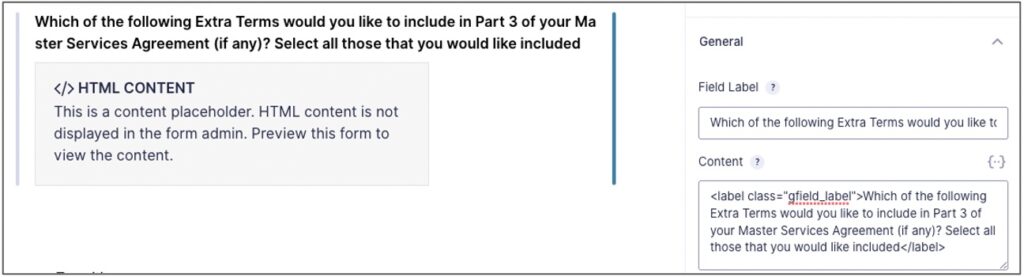
This next screenshot shows, in a closer-up view, the label class you can use for your HTML field to make the question appear the same as other field questions / labels:
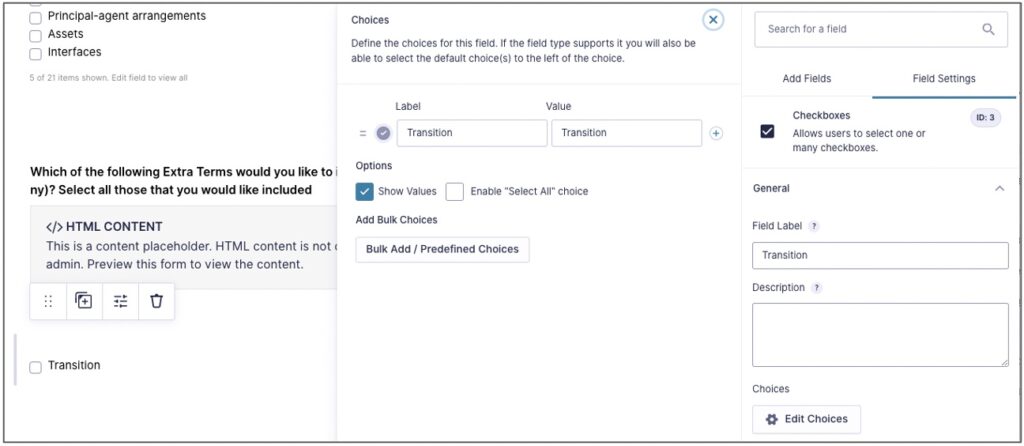
The following screenshot shows how one of the checkbox fields is set, in terms of it having a Field Label of ‘Transition’, and the choice label and value each being ‘Transition’ (take the same approach for each checkbox field):
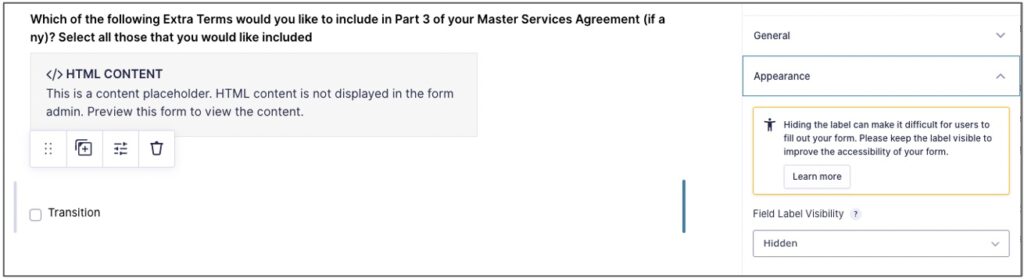
This screenshot shows how the checkbox field’s ‘Field Label Visibility’ is set to ‘Hidden’:
This screenshot shows how the four fields look on the front end:
To test against the individual checkbox fields in your template, use syntax like this:
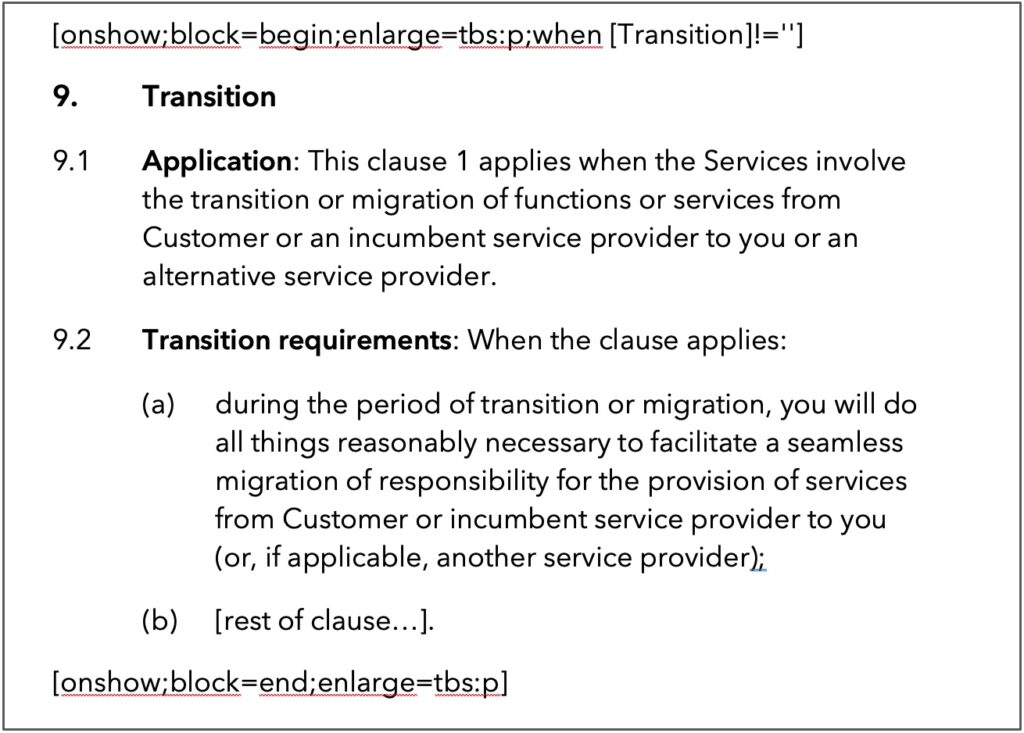
Note that this set of merge tags is saying: If the ‘Transition’ field is not empty (which is what !=” means), then include the content.